Wednesday, April 2, 2014

Create a Cache folder in the Project's root folder in a PhoneGap/Cordova Project.

When getting application root we have to use to different methods in different platforms. That’s because in Android you can access any folder and when called for the persistent storage root, from your application it will returns the root of the memory card or phone's persistent memory. But in iOS, when you called for persistent storage root from your application (like the code shown in below), it will returns the ‘Documents’ folder which is located right at where your app is installed in the phone memory.

Code:


var root;
var imageCache;           

//get the root of the application.
function getAppRoot() {

  if (device.platform == "Android") {
window.resolveLocalFileSystemURI("file:///data/data/com.geveo.myapp", onSuccess, onError);
        
  } else if (device.platform == "iOS") {
 window.requestFileSystem(LocalFileSystem.PERSISTENT,0, function(fileSystem) {
                                 root = fileSystem.root;
                                 onSuccess(root);
                                 }, function(evt) { 
                                   // error getting file system
                                   console.log(evt.target.error.code);
                                 });
}
}

//create cache if not exist iside root folder
function onSuccess(entry) {
root = entry;
root.getDirectory("ImageCache", {
                      create : true,
                      exclusive : false
                      }, onImageCacheCreateSuccess, onImageCacheCreateFail);
}

function onImageCacheCreateSuccess(dir) {
    
 imageCache = dir;
 console.log(dir.fullPath.toString());
}

function onImageCacheCreateFail(error) {
    console.log("ImageCache Create Fail"+error.code );
    
}

function onError(error) {
console.log("Error"+error.code );
}


Thursday, August 1, 2013

Solution to "cscript is not recognized as an internal or external command, operable program or batch file" error.

I got this error when I tried to build a PhoneGap project. Apparently it's a matter with Windows Script Host (WSH). You may have to install it or enable it. To install, follow this link and to enable WSH, I found this link which provides a guideline. Steps of that solution is also listed below.

1) Click the Start menu and type "regedit" on the search box. This will launch the Windows Registry Editor program.

2) Navigate to the following Registry entry:

HKEY_CURRENT_USER\Software\Microsoft\Windows Script Host\Settings

3) Select the "Enabled" entry in the right window pane. If this entry does not exist, right-click anywhere in the right window pane and select "New" followed by "DWORD Value." Name the value "Enabled."

4) Right-click the "Enabled" entry and click "Modify."

5) Change the number in the "Value" box to "1." This will re-enable WSH.

If WSH has been disabled for all users on your computer, use the same process except instead of using "HKEY_CURRENT_USER\Software\Microsoft\Windows Script Host\Settings" go to the "HKEY_LOCAL_MACHINE\Software\Microsoft\Windows Script Host\Settings" key.


Only problem is this still not resolve my issue. The thing is after enabling/ installing Windows Script Host,  you need to make sure that the path to cscript.exe is in your PATH environment variable.


Note:
please have a look at the following link to find out  how to resolve common problems occur in creating PhoneGap projects.
http://simonmacdonald.blogspot.no/2012/11/getting-create-command-to-work-on.html
And also check android target is set to it's latest target version when running it Eclipse.


Wednesday, June 19, 2013

Showing a Loading Spinner for long-running form submits in ASP.net

If a form submit takes long time due to any underground operations such as executing heavy database queries, XML parsing, etc , you may need to show the user that some processing is going on. Studies shows that average maximum waiting time of an website user is 10 seconds before he will dispose the page or try to do something. Well we don't need that.  At old days we used to show a hour glass animation to do this, but nowadays spinner is quite popular.

Simplest way to do this is, creating a div and put a <img> control inside of the div and set its source to a gif image of a spinner. It works out in most of the browsers but unfortunately not in IE 9 or in any older IE versions. Then I found out about spin.js which works in all major browsers, even in IE6. So instead of placing a gif in the div, I targeted that div for the spinner.


Reference to spin.js libaray -

<script type="text/javascript" src="@Url.Content("~/Content/spin.min.js")"></script>

HTML for loading div -

    <div id="processing">
        <div id="content">
            <p id="loadingspinner">
                Creating SPs...
            </p>
        </div>
    </div>

CSS styling -

#processing
{
    display: none;
    position: fixed;
    left: 0;
    top: 0;
    width: 100%;
    height: 100%;
    background: rgba(255,255,255,0.6);
    z-index: 1000;
}

#content
{
    display: table;
    position: fixed;
    left: 0;
    top: 0;
    width: 100%;
    height: 100%;
}

#loadingspinner
{
    display: table-cell;
    vertical-align: middle;
    width: 100%;
    text-align: center;
    font-size: larger;
    padding-top: 75px;
}

Script to show div when proceed button clicked -

 $(function () {
        $("#proceedButton").click(function () {
            $("#processing").fadeIn();
        });
    });

Script to display the spinner to indicate loading -

    $(function () {
        $("#proceedButton").click(function () {
            $("#processing").fadeIn();
            var opts = {
                lines: 12, // The number of lines to draw
                length: 7, // The length of each line
                width: 4, // The line thickness
                radius: 10, // The radius of the inner circle
                color: '#000', // #rgb or #rrggbb
                speed: 1, // Rounds per second
                trail: 60, // Afterglow percentage
                shadow: false, // Whether to render a shadow
                hwaccel: false // Whether to use hardware acceleration
            };
            var target = document.getElementById('processing');
            var spinner = new Spinner(opts).spin(target);
        });
    });

That's it. Works like magic.. ;)

But if you wan't to show the spinner when you are doing some work through a ajax postback, found a nice little article to achieve that too.

Monday, June 17, 2013

Solving "The Path already exists!" error when creating a new project in PhoneGap 2.8.1

After you installed Android SDK  and PhoneGap Cordova and  setup your environment variables -JAVA_HOME, ANT_HOME, and PATH variables, you will go for setting up a new project. In the guid it says, 
  • In a terminal window, navigate to the bin directory within the android subfolder of the Cordova distribution.
  • Type in ./create <project_folder_path> <package_name> <project_name> then press "Enter"
        where, 
        <project_folder_path> is the path to your new Cordova Android project
        <package_name> is the package name, e.g com.YourCompany.AppName
       <project_name> is the project name, e.g. YourApp (not contain spaces and dashes)

Therefore I typed in console,

create D:\ECLIPSE\eclipse-jee-helios-SR2-win32-x86_64\eclipse\workplace\phonegap\exampleApp com.geveo.android.example exampleApp 

It gives the error,
-Project path already exists!

By some testings I found out the issue and then solution was obvious. The problem is 'create' command create the destination folder you specified in the project_folder_path. In my case 'exampleApp' folder which I created just before executing the 'create' command. That's why it says project path is exists. Therefore do not create the destination folder, create command will do that for you. 

After deleting exampleApp folder I executed the create command again.

C:\Users\Asanka\Desktop\phonegap-2.8.1\phonegap-2.8.1\lib\android\bin>create D:\ECLIPSE\eclipse-jee-helios-SR2-win32 x86_64\eclipse\workplace\phonegap\exampleApp com.geveo.android.example exampleApp
Creating new android project...
Copying template files...
Copying js, jar & config.xml files...
Copying cordova command tools...
Updating AndroidManifest.xml and Main Activity...

C:\Users\Asanka\Desktop\phonegap-2.8.1\phonegap-2.8.1\lib\android\bin>


Problem solved... :)

Friday, May 10, 2013

Restoring state of a work item to it's last state when migrating or copying it to another project programmically

When you migrating a work item from a source project to a target project, you would want that work item to retain it's last state and reason. But you can't directly assign the last state to the migrated work item unless that state can be reached from the begin state by one transition. Because when migrating a work item what always happens is creating a new work item and assign field values of the source work item to new one. Therefore target work item's state will be the first state of it's work flow (You can see this by checking from the workflow of that work item type). So if you want to assign the last state, you have to traverse the work item through it's work flow to it's final state. As work item can perform one transition for once, you will need to save work item between transitions.

The other problem is how you can find a path between from first state to last state. one way to do this is querying work flow and trying to find out next states reachable from current states and move along the way. But this is tricky as you might find yourself in a closed corner and have to backtrack to find another path. But there is an easy way to get the required state transitions, as source work item is available for us. We can get  all the state transitions of a work item by work item history. therefore we get state transitions from source work item and replicate them in the target work item.


Code:

public void writeWorkItems(WorkItemCollection workItemCollection)
        {
        //creating new workitems for source work items
foreach (WorkItem workItem in workItemCollection)
            {

  WorkItem newWorkItem = null;
newWorkItem = new WorkItem(workItemTypes[workItem.Type.Name]);
------
-----
updateToLatestStatus(workItem, newWorkItem);
newWorkItem.Save();
   }
}

public void updateToLatestStatus(WorkItem oldWorkItem, WorkItem newWorkItem)

        {
            Queue<string> result = new Queue<string>();
            string previousState = null;
            string originalState = (string)newWorkItem.Fields["State"].Value;
            string sourceState = (string)oldWorkItem.Fields["State"].Value;
            string sourceFinalReason = (string)oldWorkItem.Fields["Reason"].Value;

            //try to change the status directly
            newWorkItem.Open();
            newWorkItem.Fields["State"].Value = oldWorkItem.Fields["State"].Value;
            //System.Diagnostics.Debug.WriteLine(newWorkItem.Type.Name + "      " + newWorkItem.Fields["State"].Value);

            //if status can't be changed directly... 
            if (newWorkItem.Fields["State"].Status != FieldStatus.Valid)
            {
                //get the state transition history of the source work item.
                foreach (Revision revision in oldWorkItem.Revisions)
                {
                    // Get Status          
                    if (!revision.Fields["State"].Value.Equals(previousState))
                    {
                        previousState = revision.Fields["State"].Value.ToString();
                        result.Enqueue(previousState);
                    }

                }

                int i = 1;
                previousState = originalState;
                //traverse new work item through old work items's transition states
                foreach (String currentStatus in result)
                {
                    bool success = false;
                    if (i != result.Count)
                    {
                        success = ChangeWorkItemStatus(newWorkItem, previousState, currentStatus);
                        previousState = currentStatus;
                    }
                    else
                    {
                        success = ChangeWorkItemStatus(newWorkItem, previousState, currentStatus, sourceFinalReason);
                    }
                    i++;
                    // If we could not do the incremental state change then we are done.  We will have to go back to the orginal...
                    if (!success)
                        break;
                }
            }
            else
            {
                // Just save it off if we can.
                bool success = ChangeWorkItemStatus(newWorkItem, originalState, sourceState);
            }
        }

        private bool ChangeWorkItemStatus(WorkItem workItem, string orginalSourceState, string destState)
        {
            //Try to save the new state.  If that fails then we also go back to the orginal state.
            try
            {
                workItem.Open();
                workItem.Fields["State"].Value = destState;
                workItem.Save();
                return true;
            }
            catch (Exception)
            {
                logger.Info(String.Format("Failed to save state for workItem : {0}  type:{1} state from {2} to {3}", workItem.Id, workItem.Type.Name, orginalSourceState, destState));
                logger.Info(String.Format("rolling workItem status to original state {0}", orginalSourceState));
                //Revert back to the original value.
                workItem.Fields["State"].Value = orginalSourceState;
                return false;
            }
        }

        //save final state transition and set final reason.
        private bool ChangeWorkItemStatus(WorkItem workItem, string orginalSourceState, string destState, string reason)
        {
            //Try to save the new state.  If that fails then we also go back to the orginal state.
            try
            {
                workItem.Open();
                workItem.Fields["State"].Value = destState;
                workItem.Fields["Reason"].Value = reason;

                ArrayList list = workItem.Validate();
                workItem.Save();

                return true;
            }
            catch (Exception)
            {
                logger.Info(String.Format("Failed to save state for workItem: {0}  type:{1} state from {2} to {3}", workItem.Id.ToString(), workItem.Type.Name, orginalSourceState, destState));
                logger.Info(String.Format("rolling workItem status to original state {0}", orginalSourceState));
                //Revert back to the original value.
                workItem.Fields["State"].Value = orginalSourceState;
                return false;
            }
        }


Tuesday, May 7, 2013

Migrate all your project work items to another project : Total TFS Migration Tool

As I mentioned in my first post of  Creating a Test Plans and Cases Migration Tool For TFSWe had to move some team projects from TFS 2010 Server to a newly created TFS 2012 Server. Usually You can restore all your projects by using a tfs backup. But there can be many reasons that will cause you to need a migration tool. In our case our database and backup are both have corrupted. Therefore we were unable to do a restore from backup.

Migration involves moving all source files,work items, attachments, links and team queries. Though moving source files is an easy task, moving work items is not an easy feat. This is due to many reasons. Such as TFS 2010 use the Scrum 1.0 template and TFS 2012  use Scrum 2.0 template(Update 2 use 2.2 template). Migration is done through the APIs of TFS by using external tools, and is a lossy data transfer. There were some migration tools but  it all have certain limitations; such as not supporting test case migration, permission, etc. Therefore we decided to built a custom tool that match our need.

After we finished building a custom tool to match our needs, we thought of developing a generic tool that might help others who have the same need; as there isn't a generic tool to do this. Building a total generic tool for TFS Migration is almost impossible as every company that use TFS as a source control software and as a team management software, have customized it to suit their needs and development methodologies. But we tried to make it as generic as we can. But as the source code is available, anyone can customize this tool to match their requirements. The tool is available at  CodePlex -  Total TFS Migration Tool.


Scope of the tool:
At this point in time, the TFS Migration Tool is scoped to only support the following TFS features:
  • Work Item Migration - This includes the migration of all work items, fields, in-use areas, iterations, links, attachments, shared queries.
  • Test Plan Migration – This includes migration of all test plans and test suits.


Limitations:
  • No Version Control – Project source code will not be transferred.
  • Work item history will not be transferred.

Features:
  • Copy custom fields of relevant work item types in source project to target project. 
  • Copy workflows from source TFS project to target TFS project.
  • Map the mismatched source fields with target fields.
  • Logging mechanism to track entire migration process

How to use the tool is described in full detail in the documentation. Feedback from end users will also be critical to make this more generic, so please help us by sharing your experiences and feedback.

Note:
Tool can be used to copy custom fields and work flows, but if you prefer you can manually copy them using Process Editor and ignore those tabs in the tool as those features are not required by the tool.

Wednesday, May 1, 2013

How To Create a Test Plans and Cases Migration Tool For TFS : Part 4

All my previous posts (part 1, Part 2, and Part 3) have covered the knowledge needed you to build a test plan migration tool for TFS. I put all those together and create a simple WPF project that you can find it here.
Tool has two operational modes.

1) Migration
2) Restore

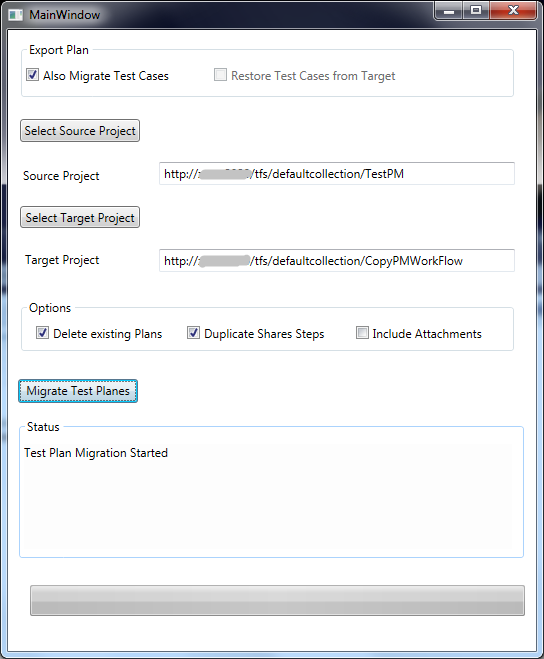
In Migration mode it will copy test cases from source project to target project as well as test plans and suits.  tool will copy all test plans, suits and test cases from the source project and create Test plans, suits and  cases similar to source project. Not only test cases, it will also copy all test steps into test cases and duplicate shared steps that's linked to test cases. You can choose whether or not to duplicate shared steps. but if you choose not to include  shared test steps, software will not add any shared steps. 

But In Restore mode it will only copy test plans and suits. but it will connect appropriate test cases from querying existing work item collection(Restore mode is when you have all test cases in TFS, but lost test plans and have the option of restore those plans from an older test plan version).  This can be happen as deleting test plans only delete test plans and test suits and test cases will remain as they are work items. Therefore in this mode you won't need restoring test cases, shared steps, attachments.


Migration Mode
Connect to source and target project and select options you need.


Halfway through the migration


Migration completed


check test plan,suit and case hierarchy


Restore Mode


Limitations

One problem I was unable to solve is including links of Test cases to other work items while copying test cases when operating in Migration mode.
Including attachments part is still in progress. Also I hope to include copying iterations and areas in future. For now all the newly created test cases will be in 'New' status, not in their last recorded states. 

You can find the tool here,
https://tfstestpscexporter.codeplex.com